How to create ZIP files
On Windows, Mac and Linux
 When you use our online registration service, you will be asked to upload the files that you are seeking to protect.
If you have a lot of files to upload, or if you need to preserve the directory structure (e.g. for a website or software code), then we strongly recommend creating a zip archive containing all the files.
What is a zip file?
Zip is an standard archiving and compression format. It serves two purposes:
- It compresses the data, reducing the total overall size of your files.
- It allows you to store any number of files and folders together in a single archive file.
Advantages
When it comes to uploading your work to us, zip files have a number of advantages:
- Reduced number of files to upload.
It is far easier to upload one zip file than 100s of individual files.
- Preserve directory structure.
If you are registering files for a work with a hierarchical directory structure, such as a website or software project, the directory structure will be retained by the zip file. When it is unzipped the directory hierarchy will be the same as it was when you created the zip file.
- Reduce size.
The zip file format supports compression, so the size of the zip archive will typically be smaller than the total files it contains. This means your upload will also be faster.
Creating a zip file
First get all the files that you need to submit together in a folder on your computer.
For most operating systems, the ability to create zip files should be already available to you without installing any extra software.
Apple Mac.
To compress the folder on an Apple Mac, select the the folder and bring up the context menu by either:
- holding down Control key as you click,
- right click, or,
- tap it using two fingers.
Choose “Compress” from the shortcut menu.
If you want to test that everything is as expected, you can unzip a zip file again, either by double clicking the file or bringing up the context menu and selecting 'Open with' and choosing the unzipping program (probably called "Archive Utility").
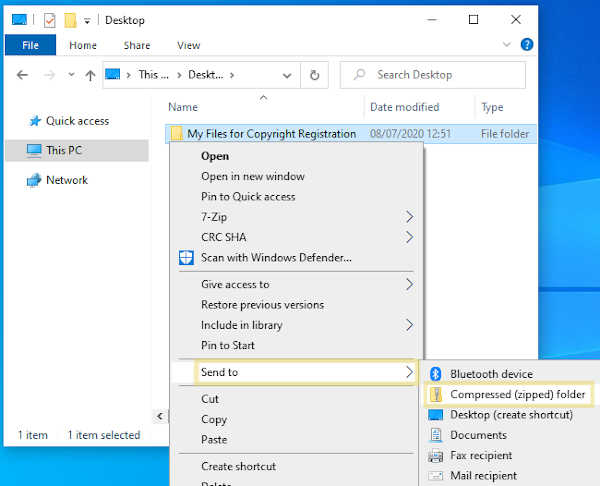
Windows
If you are on a Windows desktop, right click on the folder, hover over/select 'Send to' on the context menu and then select 'Compressed (zipped) folder'.
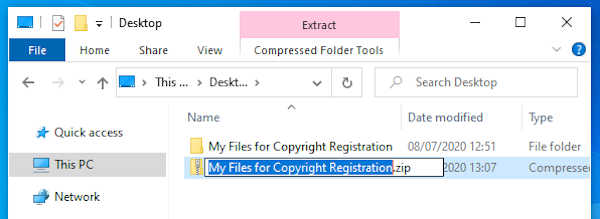
If you want to test that everything is as expected, you can unzip a ZIP file, by right clicking on the file and selecting 'Extract All' from the context menu.
Linux (and Mac terminal) command line
Depending on the Linux distribution you may have different GUI options (or none), but you will almost certainly have zip installed as a command line program.
If you open a terminal console in the parent directory, or used the cd command to navigate there from the command line, you should then be able to run the command on the folder.
The syntax is 'zip -r <zip file name> <directory name>'. The '-r' option tells zip to include files/folders in sub-directories.
For example: zip -r readyToUpload.zip "My Files for Copyright Registration"
Use quotes around the zip file or folder name if the name contains any spaces.
If you want to test that everything is as expected, you can extract the contents with the command unzip, e.g. unzip myFiles.zip.
As Linux and Mac operating systems are both Unix based they operate very similarly. The same commands should work on a Mac as well.
Archives larger than 2GiB
If your .zip archive is larger than the per file upload limit (currently 2GiB), you should split the work up into 2 or more zip files.
There are a few options, depending on how technically minded you are:
- Easy
The simplest option here is to share the files across 2 (or more) directories and create Zip files for each directory.
- Software tools
There are software programs such as WinZip (for windows), 7zip (for Windows), p7zip (for Linux) or StuffIt Expander (for Mac, iOS & Windows), that provide more advanced features.
You will need to read the documentation for the specific program for instructions on how to split archives.
- Command line (Linux or Mac)
If you are comfortable using the Linux or Mac command line, the zip program just requires one small change to the command above:
zip -r -s 2g <zip file> <directory name>The ‘-s 2g’ option tells zip to split the archive into chunks of 2GiB size;
e.g.zip -r -s 2g readyToUpload.zip “My Files for Copyright Registration”If you want to test the result, unzipping split archives, takes a little more effort, as 2 commands are needed; one to unsplit and one to unzip:
e.g.zip -s 0 split.zip --out unsplit.zip; unzip unsplit.zip.